Theoretically, any single-phase, fractional horsepower induction motor can be reversed from one direction of rotation to the other. In practice, it may be difficult or impossible to do, simply because of the way that the windings are physically connected internally.
- - -
Here's a schematic representation of what's involved. (The centrifugal switch -- 'CENT. SWITCH' -- is shown in its run/open position.)
In the 'a)' figure, we have a typical induction motor's windings. When the motor is stopped, or not yet up to full speed, the start winding is connected in parallel with the run winding by way of a closed centrifugal switch. Once the motor gets up to speed, the centrifugal switch opens, and disconnects the start winding.
The physical and electrical relationships between the start and run windings give the motor its characteristic direction of rotation.
In the 'b)' figure, the electrical relationship between the start and run windings has been reversed; hence the motor's direction of rotation is reversed.
Now, that was ever so easy to do on paper. Let's open up an actual non-reversible motor, and see how those winding connections look as physical hardware. I have a 1/4 hp split phase unit that will be just the thing for a subject here.
We can see from the motor's connection terminal board that the motor is not meant to be reversible.

There are only the two line terminals for connecting the line voltage supply (L1 and L2 in the schematic), and it doesn't matter how those are connected, the motor will still exhibit the same direction of rotation. A reversible motor will present additional wiring that permits you to swap two wire locations to reverse the motor.
I'll just scribe alignment marks on the motor's frame and ends, and open up the motor.
- - -
And here we can see the internal wiring.

There are only three accessible wires. Buried away somewhere in the stator winding there's a common connection between one end of the start winding, and one end of the run winding. In order to reverse the motor, that common connection must be broken, but the connection is inaccessible.
And there we have the difficulty in reversing a non-reversible motor. While it's theoretically possible to do it, the physical construction of some motors' windings may make it extremely difficult or impossible to do.
That said, I have successfully reversed a 'non-reversible' motor. It was a motor where I was able to gain access to both ends of the start and run windings.
* * *
Painting The Motor Frame -- THURSDAY, JULY 17, 2014
Since I have the motor apart, I figure I may as well clean it up properly, and give the frame a decent paint job. What passes for a factory paint job on these things is nothing to be proud of, and it's not like I have lots of other pressing things to do.
- - -
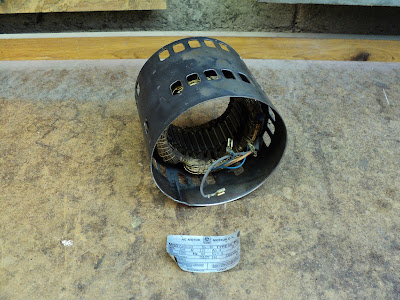
I peeled off the I.D. label with the help of a heat gun and paint thinner.
I don't know how I'll ever get the label back on, but I'll worry about that later. Compressed air got the inside of the frame with its stator/windings reasonably clean. Lacquer thinner cleaned up the outer surface, and took off a good deal of the factory paint. Here's the motor frame propped up on an empty tin on a turntable, ready for a primer coat.
I stuffed in a sheet of paper toweling up top, to mask the stator/windings. Here goes.
And that's beginning to look like a credible paint job.
Two coats of black enamel to follow, and it'll be done.
- - -
Here it is, fully painted.
I'll set that aside for the paint to harden for a week, then I can reassemble the motor. Meanwhile, there's still the mount portion of the motor to be painted.
- - -
The Motor Mount
Some things just don't inherently lend themselves to being supported for spray painting, so a little modification is in order.
I drilled and tapped a hole, so I could attach a rod for a 'handle'. Now I have a way to manipulate the thing for painting. The motor mount can get the same primer and black enamel treatment that the motor's frame just did.
- - -
And here it is fully primed and painted.
Once I put it all back together, I'll still have a non-reversible motor, but at least it will be a better looking one.
- - -
All Done -- MONDAY, JULY 28, 2014
Here it is all done up and ready to go.
The adhesive on the back of the I.D. label was still somewhat effective, so I just stuck the label back on.
That wasn't a difficult job to do, and the results were well worth the effort. There'll be no more shabby looking motors on equipment from this shop.
# # #
# # #


